For my last semester of college, I took a class on iOS development. The last assignment of the class was a five week project of our own choosing. My idea was to build a better bus locator app for the local bus service, CATA. The CATA available on the app store leaves a lot to be desired. Most notably, I want to see multiple bus routes on the map simultaneously. This is very useful for anyone that uses the buses to get around campus since there are four bus routes that go around campus. When you’re running for the bus, every second counts so it’s quite advantageous to be able to see all four campus routes on the same map at once.
The first challenge was getting access to the API that provides the bus location info. CATA provides a web-based bus locator at http://realtime.catabus.com/InfoPoint/, but this is quite basic; nothing more than the bus location and the data from the server is all XML (yuck). Fortunately, there is a new web-based bus locator at http://50.203.43.19/InfoPoint/. Besides the fact that it’s just an IP address, this page provides more information including the direction of the bus, how many people are on board, even the name of the driver and the format of the data from the server is JSON (yay!). But how to get URLs to get data from the API? This is actually quite easy with the Live HTTP Headers Firefox addon. Just refresh the page and look for RESTful URLs. For this project these turned out to be:
- http://50.203.43.19/InfoPoint/rest/RouteDetails/Get/[route ID] for info about a specified route. This includes info about buses on the route, the coordinates of each stop on the route, and the filename of the KML file for the route.
- http://50.203.43.19/InfoPoint/rest/StopDepartures/Get/[stop ID] for upcoming departures from the specified stop. This includes the route IDs of buses as well as their scheduled and expected times of arrival and departure in UNIX time.
- http://50.203.43.19/InfoPoint/Resources/Traces/[KML filename]. The KML file is used for drawing the line of the route on a map. The filename is given in the route details JSON file.
- There was also a resource for downloading all the available routes, but since these rarely change, I chose to keep a static copy of these in a plist distributed with the app so that it does not need to download them each time the app is started (like the existing CATA app does).
The annoying part of parsing the data from the server was the KML file. KML, or Keyhole Markup Language, is used for expressing items on maps. In this case, the lines of a bus route overlayed on the streets. The Google Maps SDK does not have the ability to read a KML directly, so I had to either parse it myself or use a KML parsing library. Fortunately, there is a KML Framework for iOS. Unfortunately, its documentation is severely lacking so much of the time I spent with it was reading the source code trying to figure out how to get data out of the KML file it parsed. All said and done, it looked something like the following:
Downloading and parsing the file:
1
2
3
4
- (void) downloadAndParseRouteKmlForFile:(NSString*)filename {
   self.routeKml = [KMLParser parseKMLAtURL:[NSURL URLWithString:[NSString stringWithFormat:
                   @"%s/InfoPoint/Resources/Traces/%@", kServerHostname, filename]]];
}
Converting the parsed KML data to GMSPolyLines:
1
2
3
4
5
6
7
8
9
10
11
12
13
14
15
16
17
18
19
20
21
22
23
24
25
26
27
28
29
30
31
32
33
- (void) addRoutesPathOverlay {
    for(SPTRoute *route in self.routes) {
        for(KMLPlacemark *placemark in [route.routeKml placemarks]) {
            // If the placemark is a single line, draw it to the map
            if([placemark.geometry isKindOfClass:[KMLLineString class]]) {
                [self addKmlLineToMap:(KMLLineString*)placemark.geometry ForRoute:route];

            // If the placemark contains multiple geometries, draw each one to the map individually
            } else if([placemark.geometry isKindOfClass:[KMLMultiGeometry class]]) {
                KMLMultiGeometry *multiGeo = (KMLMultiGeometry*)[placemark geometry];

                for(KMLAbstractGeometry *geometry in multiGeo.geometries) {
                    [self addKmlLineToMap:(KMLLineString*)geometry ForRoute:route];
                }
            }
        }
    }
}

- (void) addKmlLineToMap:(KMLLineString*)kmlLine ForRoute:(SPTRoute*)route {
    // Convert the KML coordinates to a Google Maps Path
    GMSMutablePath *routePath = [[GMSMutablePath alloc] init];
    for(KMLCoordinate *coordinate in kmlLine.coordinates) {
        CLLocationCoordinate2D cllCoordinate = CLLocationCoordinate2DMake(coordinate.latitude, coordinate.longitude);
        [routePath addCoordinate:cllCoordinate];
    }

    // Convert the path to a line which can be displayed on the map as an overlay
    GMSPolyline *routeLine = [GMSPolyline polylineWithPath:routePath];
    routeLine.strokeWidth = 8;
    routeLine.strokeColor = route.color;
    routeLine.map = self.mapView;
}
After all this parsing and downloading, the end result is something like this:
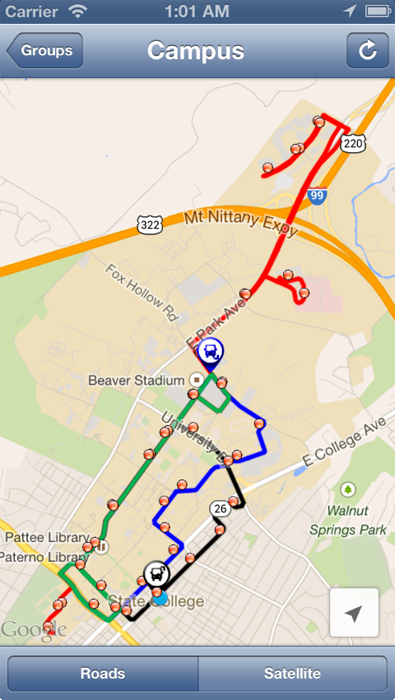
There were only two buses running when this screenshot was taken, but you can see that all four campus routes (each a different color) are present, and the buses on the map show their direction. Tapping on a bus shows the direction (inbound or outbound), the number of people on board, the status of the bus (on-time or late), and the speed in MPH of the bus. Tapping on a stop shows the upcoming departures for that stop and how long until each bus leaves.
The second part of the app was the navigation to select a bus. My goal was to make it as fast as possible for a user to find the bus he or she is looking for and get to the map. This meant organizing the buses by default by their ridership. In State College, some routes are used much more often than others. It was logical to put these buses at the top by default. Furthermore, default groups exist (such as grouping the normal and express routes for a given section of town) so that users will possibly already have the groups they need created for them. If a user only cares about a single route or group, a preference can be set to skip the tableviews entirely when starting the app and go directly to the map with that route/group displayed. For the users that do not fall into the majority of use cases, the tableviews have the ability to create new groups, delete existing groups, and reorder routes/groups so that commonly used routes are at the top of the list.
All of this is easily accomplished with Core Data. The basic database structure is a generic parent object with two chilren, a route type and a group type. Groups contain references to the routes that comprise them and routes know what groups they belong to. This is shown in the following relationship diagram:
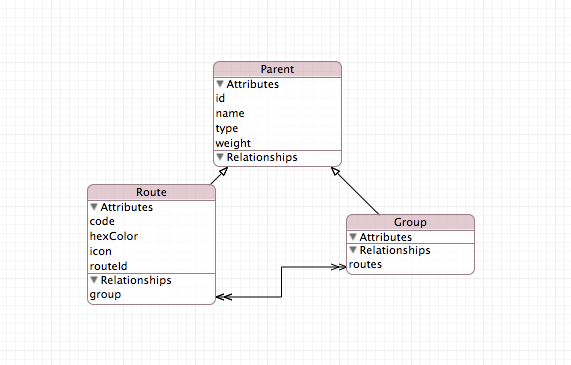
Using Core Data this way makes it dead simple to support deletion, reordering, and creation of new entities in the tableviews. Well, dead simple once the Core Data backend is all set up. Setting up said backend is anything but simple.
That said, the finished product looked as such:
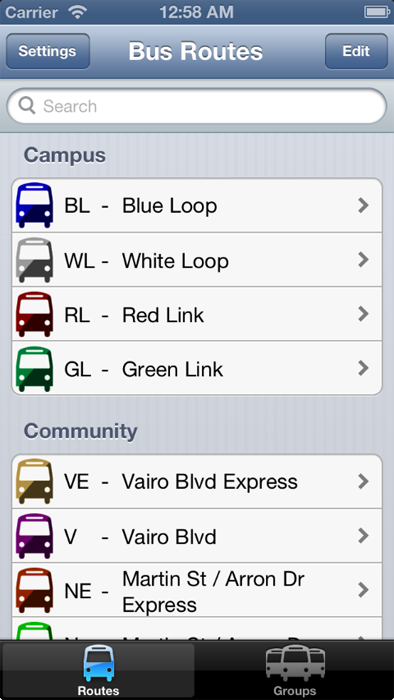
I especially like how the route images are colored dynamically when the app is first started. This made it very quick to change the route image if necessary. It’s also pretty simple to change the color of an image. See below.
1
2
3
4
5
6
7
8
9
10
11
12
13
14
15
16
17
18
19
20
21
// http://stackoverflow.com/questions/3514066/how-to-tint-a-transparent-png-image-in-iphone
+ (UIImage *) tintImage:(UIImage*)image withColor:(UIColor *)tintColor {
    UIGraphicsBeginImageContextWithOptions (image.size, NO, [[UIScreen mainScreen] scale]);

    CGContextRef context = UIGraphicsGetCurrentContext();
    CGRect rect = CGRectMake(0, 0, image.size.width, image.size.height);

    [image drawInRect:rect blendMode:kCGBlendModeNormal alpha:1.0f];

    // Tint the image (looses alpha)
    CGContextSetBlendMode(context, kCGBlendModeOverlay);
    [tintColor setFill];
    CGContextFillRect(context, rect);

    // Mask by alpha values of original image
    [image drawInRect:rect blendMode:kCGBlendModeDestinationIn alpha:1.0f];

    UIImage *tintedImage = UIGraphicsGetImageFromCurrentImageContext();
    UIGraphicsEndImageContext();
    return tintedImage;
}
In all, this was a great project to wrap up my last semester of college. For those interested, all the source code is available on GitHub.
If you’re in the State College area and hoping for another CATA app to be on the App Store, don’t hold your breath. This was a fun little project for class, but I have no interest in maintaining an app on the store or developing for Apple platforms in general. If you are a developer in the State College area and would like to take over ownership of this app, talk to me and maybe we can work something out.