“Why would you ever want to write a program that changes its code while it’s running? That’s a horrible idea!”
Yes, yes it is. It’s a good learning experience though. This is not something you would ever do outside of exploring a curiosity.
Self-mutating/self-modifying programs aren’t useful for a whole lot. They make for difficult debugging, the program becomes hardware dependent, and the code is extremely tedious and confusing to read unless you are an expert assembly programmer. The only good use for self-mutating programs in the wild I know of is as a cloaking mechanism for malware. My goal is purely academic so I venture into nothing of the sort here.
Warning: This post is heavy on x86_64 assembly of which I am no expert. A fair amount of research went into writing this and it’s possible (almost expected) that mistakes were made. If you find one, send an email so that it may be corrected.
The first step of writing a self-mutating program is being able to change the code at runtime. Programmers figured out long ago that this was a bad idea and since then protections have been added to prevent a program’s code from being changed at runtime. We first need to understand where the program’s instructions live when the program is being executed. When a program is to be executed, the loader will load the entire program into memory. The program then executes inside of a virtual address space that is managed by the kernel. This address space is broken up into different segments as illustrated below.
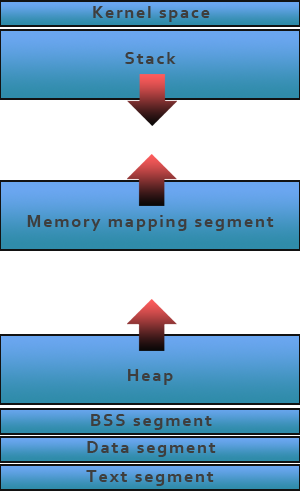
In this case, we’re only concerned with the text segment. This is where the instructions of the process are stored. Behind the address space are pages which are handled by the kernel. These pages map to the physical memory of the computer. The kernel controls permissions to each of these pages. By default, the text segment pages are set to read and execute. You may not write to them. In order to change the instructions at runtime, we’ll need to change the permissions of the text segment pages so that we write to them.
Changing the permissions of a page can be done with the mprotect() function. The only tricky part of mprotect() is that the pointer you give it must be aligned to a page boundary. Here is a function that given a pointer, moves the pointer to the page boundary and then changes that page to read, write, and execute permissions.
1
2
3
4
5
6
7
8
9
10
int change_page_permissions_of_address(void *addr) {
    int page_size = getpagesize();
    addr -= (unsigned long)addr % page_size;

    if(mprotect(addr, page_size, PROT_READ | PROT_WRITE | PROT_EXEC) == -1) {
        return -1;
    }

    return 0;
}
If we give this function a pointer that points to an address in the text segment, that page in the text segment will now be writeable. It is important to note that the OS may refuse to allow the text segment to be writeable. I’m working on Linux, which does allow for writing to the text segment. If you are using another OS, make sure you’re checking the return value to see if the call to mprotect() failed. In the examples below, we assume that the function we’ll be changing is contained entirely on a single page. For long functions, this may not be the case.
Now that we can write to the text segment, the next question is: what do we write?
Let’s start with something simple. Say I have the following function:
1
2
3
4
5
void foo(void) {
    int i=0;
    i++;
    printf("i: %d\n", i);
}
foo() creates and initializes a local variable, i, to 0, then increments it by 1 and prints it to stdout. Let’s see if we can change the value that i is incremented by.
To accomplish this goal, we’ll need to see not just the instructions that foo() compiles to, but the actual machine code that foo() is assembled to. Let’s put foo() is a full program so it’s easier to do this.
1
2
3
4
5
6
7
8
9
10
11
12
13
#include <stdio.h>

void foo(void);

int main(void) {
    return 0;
}

void foo(void) {
    int i=0;
    i++;
    printf("i: %d\n", i);
}
Now that we have foo() in a full C program, we can go ahead and compile it. Let’s go ahead and compile it with:
1
$ gcc -o foo foo.c
This is where things start to get interesting. We need to disassemble the binary gcc created for us to see the instructions that comprise foo(). We can do this with the objdump utility like so:
1
$ objdump -d foo > foo.dis
If you open the foo.dis file in a text editor, around line 128 (depending on the version of gcc used, foo may have slightly different instructions) you should see the disassembled foo() function. It looks like the following:
1
2
3
4
5
6
7
8
9
10
11
12
13
14
15
16
17
0000000000400538 <foo>
  400538:	55                   	push   %rbp
  400539:	48 89 e5             	mov    %rsp,%rbp
  40053c:	48 83 ec 10          	sub    $0x10,%rsp
  400540:	c7 45 fc 00 00 00 00 	movl   $0x0,-0x4(%rbp)
  400547:	83 45 fc 01          	addl   $0x1,-0x4(%rbp)
  40054b:	8b 45 fc             	mov    -0x4(%rbp),%eax
  40054e:	89 c6                	mov    %eax,%esi
  400550:	bf 14 06 40 00       	mov    $0x400614,%edi
  400555:	b8 00 00 00 00       	mov    $0x0,%eax
  40055a:	e8 b1 fe ff ff       	callq  400410
<printf@plt>
  40055f:	c9                   	leaveq
  400560:	c3                   	retq
  400561:	66 2e 0f 1f 84 00 00 	nopw   %cs:0x0(%rax,%rax,1)
  400568:	00 00 00
  40056b:	0f 1f 44 00 00       	nopl   0x0(%rax,%rax,1)
If you have never worked with x86_64 code before, this might look a little foreign. Basically what’s going on here is that we are pushing the stack down 4 bytes (the size of an integer on my system) to use as the storage location for the variable i. We then initialize these 4 bytes to 0 and then add 1 to this value. Everything after this (40054b) is moving values around to prepare for calling the printf() function.
That said, if we want to change the value that i is incremented by, we need to change the following instruction:
1
400547:	83 45 fc 01          	addl   $0x1,-0x4(%rbp)
Before going any further though, let’s break this instruction down.
400547 |
83 45 fc 01 |
addl $0x1,-0x4(%rbp) |
|---|---|---|
| The first column is the memory location of this instruction. | The second column is the machine code of the instruction. These are the bytes that the CPU will read and react to. | The third column is the human readable (well, readable to humans with some prior knowledge), disassembled machine code from the second column. |
Going further, we can break down the instruction to understand its operands:
addl |
$0x1 |
-0x4(%rbp) |
|---|---|---|
addl is the instruction. There are multiple add commands in the x86_64 instruction set. This one means add an 8bit value to a register or memory location. |
$0x1 is an immediate value. Dollar signs denote immediate values and the 0x prefix denotes a hexadecimal number follows. In this case, the number is just 1 since 0x1 = 1 in base 10. |
-0x4(%rbp) is the memory address to add the value to. Here it is saying to add it to the current location of the base stack pointer offset by 4 bytes. This is where our i variable was put on the stack. |
Now that we understand the human readable form of the instruction, let’s dive into the machine instruction. All x86_64 instructions have the following format:

This is where x86_64 gets really complicated. x86_64 instructions have a variable length so to the unfamiliar, decoding instructions by hand can be a confusing and time consuming process. To make it easier, there are various documentation sources. x86ref.net has great documentation once you learn how to read it such as the reference for the addl instruction. For the brave, there is also the Intel 64 and IA-32 Architectures Developer’s Manual: Combined Vols. 1, 2, and 3 (warning: 3,000 page PDF).
In our case, these bytes mean the following:
83 |
45 |
fc |
01 |
|---|---|---|---|
83 is the opcode of the addl instruction. All instructions have an opcode that tells the CPU what instruction to perform. |
45 is the ModR/M byte. Per Intel's documentation, 0x45 = [RBP/EBP]+disp8. This means that 0x45 denotes the %rbp register is the destination and the byte that follows (in this case, 0xfc) is the displacement byte. |
fc is the displacement byte. 0xfc = 0b11111100. The displacement byte is sign-extended so this value is really just 0b100 or 4. |
01 is the immediate value that will be added to the given memory address. This is the byte we need to change in order to change the value that i is incremented by. |
How did I determine what the ModR/M byte meant? There is a handy table in the documentation that explains what each ModR/M byte means. This table is also available in the Intel manual linked to above as Table 2-2 in section 2-5 of volume 2A (or page 445 of the PDF).
Moving right along, we now are able to change the instruction and know what to change; we just need to know how to change it.
To recap, we want to change the 01 byte in the addl $0x1,-0x4(%rbp) instruction.
To do this, we need to get the address of that byte. It’s trivial to get the address of foo() at runtime so all we need to do is find the offset of this byte from start of foo(). There’s two ways we can do this:
- Use the objdump disassembly from earlier to count the number of bytes between the start of the function and the byte we want.
- Write a function to print the instructions of
foo()and their offset from the start of the function.
Why not do both?
Let’s look at the objdump method first. The disassembly of foo() up to the addl instruction we’re interested in is:
1
2
3
4
5
6
0000000000400538 <foo>:
  400538:	55                   	push   %rbp
  400539:	48 89 e5             	mov    %rsp,%rbp
  40053c:	48 83 ec 10          	sub    $0x10,%rsp
  400540:	c7 45 fc 00 00 00 00 	movl   $0x0,-0x4(%rbp)
  400547:	83 45 fc 01          	addl   $0x1,-0x4(%rbp)
The function starts at 400538 and the byte we’re interested in is at 400550 (400547 + 3) so that means the offset is 400550 - 400538 = 18.
We can confirm this by writing a short function to print the instructions of a given function. Here’s the modified program from above:
1
2
3
4
5
6
7
8
9
10
11
12
13
14
15
16
17
18
19
20
21
22
23
24
25
26
27
28
29
#include <stdio.h>

void foo(void);
void bar(void);
void print_function_instructions(void *func_ptr, size_t func_len);

int main(void) {
    void *foo_addr = (void*)foo;
    void *bar_addr = (void*)bar;

    print_function_instructions(foo_addr, bar_addr - foo_addr);

    return 0;
}

void foo(void) {
    int i=0;
    i++;
    printf("i: %d\n", i);
}

void bar(void) {}

void print_function_instructions(void *func_ptr, size_t func_len) {
    for(unsigned char i=0; i<func_len; i++) {
        unsigned char *instruction = (unsigned char*)func_ptr+i;
        printf("%p (%2u): %x\n", func_ptr+i, i, *instruction);
    }
}
Note that to determine the length of foo(), we added an empty function, bar(), that immediately follows foo(). By subtracting the address of bar() from foo() we can determine the length in bytes of foo(). This, of course, assumes that bar() immediately follows foo().
The output of running this:
1
2
3
4
5
6
7
8
9
10
11
12
13
14
15
16
17
18
19
20
21
22
23
24
25
26
27
28
29
30
31
32
33
34
35
36
37
38
39
40
41
42
$  ./foo
0x40056c ( 0): 55
0x40056d ( 1): 48
0x40056e ( 2): 89
0x40056f ( 3): e5
0x400570 ( 4): 48
0x400571 ( 5): 83
0x400572 ( 6): ec
0x400573 ( 7): 10
0x400574 ( 8): c7
0x400575 ( 9): 45
0x400576 (10): fc
0x400577 (11): 0
0x400578 (12): 0
0x400579 (13): 0
0x40057a (14): 0
0x40057b (15): 83
0x40057c (16): 45
0x40057d (17): fc
0x40057e (18): 1           <-- Here's the byte we want!
0x40057f (19): 8b
0x400580 (20): 45
0x400581 (21): fc
0x400582 (22): 89
0x400583 (23): c6
0x400584 (24): bf
0x400585 (25): b4
0x400586 (26): 6
0x400587 (27): 40
0x400588 (28): 0
0x400589 (29): b8
0x40058a (30): 0
0x40058b (31): 0
0x40058c (32): 0
0x40058d (33): 0
0x40058e (34): e8
0x40058f (35): 7d
0x400590 (36): fe
0x400591 (37): ff
0x400592 (38): ff
0x400593 (39): c9
0x400594 (40): c3
At address 0x40057e is our 0x1 byte. As you can see, the offset is indeed 18.
We’re finally read to change some code! Given a pointer to foo(), we can create an unsigned char pointer to the exact byte we want to change as such:
1
2
3
unsigned char *instruction = (unsigned char*)foo_addr + 18;

*instruction = 0x2A;
Assuming we did everything right, this will change the immediate value in the addl instruction to 0x2A or 42. Now when we call foo(), it will print 42 instead of 1.
And putting it all together:
1
2
3
4
5
6
7
8
9
10
11
12
13
14
15
16
17
18
19
20
21
22
23
24
25
26
27
28
29
30
31
32
33
34
35
36
37
38
39
40
41
42
43
44
45
46
47
48
49
50
51
#include <stdio.h>
#include <unistd.h>
#include <errno.h>
#include <string.h>
#include <sys/mman.h>

void foo(void);
int change_page_permissions_of_address(void *addr);

int main(void) {
    void *foo_addr = (void*)foo;

    // Change the permissions of the page that contains foo() to read, write, and execute
    // This assumes that foo() is fully contained by a single page
    if(change_page_permissions_of_address(foo_addr) == -1) {
        fprintf(stderr, "Error while changing page permissions of foo(): %s\n", strerror(errno));
        return 1;
    }

    // Call the unmodified foo()
    puts("Calling foo...");
    foo();

    // Change the immediate value in the addl instruction in foo() to 42
    unsigned char *instruction = (unsigned char*)foo_addr + 18;
    *instruction = 0x2A;

    // Call the modified foo()
    puts("Calling foo...");
    foo();

    return 0;
}

void foo(void) {
    int i=0;
    i++;
    printf("i: %d\n", i);
}

int change_page_permissions_of_address(void *addr) {
    // Move the pointer to the page boundary
    int page_size = getpagesize();
    addr -= (unsigned long)addr % page_size;

    if(mprotect(addr, page_size, PROT_READ | PROT_WRITE | PROT_EXEC) == -1) {
        return -1;
    }

    return 0;
}
Compile it with:
1
$ gcc -std=c99 -D_BSD_SOURCE -o foo foo.c
Running it gives the output:
1
2
3
4
5
$ ./foo
Calling foo...
i: 1
Calling foo...
i: 42
Success! The first time we call foo() it prints 1 just as its source code says it should. Then after we modify it it prints 42.
And there you have it, a self-mutating C program. However, this is pretty boring; all it does is change a number. Wouldn’t it be more far more interesting if we could change foo() to do something else entirely? How about exec() a shell?
How would we go about starting a shell when we call foo() though? The natural choice is to use the execve syscall, but that’s a lot more involved than just changing a single byte.
If we’re going to change foo() to exec a shell, we’re going to need the instructions for doing as such. Fortunately for us, the security community loves using machine code for exec’ing shells so this is easy to get our hands on. A quick search for “x86_64 shellcode” and we have the instructions for exec’ing a shell. These are as follows:
1
2
3
4
5
6
7
8
9
10
11
char shellcode[] =
    "\x48\x31\xd2"                              // xor    %rdx, %rdx
    "\x48\x31\xc0"                              // xor    %rax, %rax
    "\x48\xbb\x2f\x62\x69\x6e\x2f\x73\x68\x00"  // mov    $0x68732f6e69622f, %rbx
    "\x53"                                      // push   %rbx
    "\x48\x89\xe7"                              // mov    %rsp, %rdi
    "\x50"                                      // push   %rax
    "\x57"                                      // push   %rdi
    "\x48\x89\xe6"                              // mov    %rsp, %rsi
    "\xb0\x3b"                                  // mov    $0x3b, %al
    "\x0f\x05";                                 // syscall
This code was taken from http://www.exploit-db.com/exploits/13691/ with two modifications by me as outlined below.
- I added
xor %rax, %raxso that the%raxregister is zero’d. Otherwise, it may not be and this would cause a segfault. - I changed the immediate value
$0x68732f6e69622f2fto$0x68732f6e69622f00. This allowed me to remove a shift instruction which kept the total length at 30 bytes. Normally, shellcode like this is injected via buffer overflows or other kinds of malicious attacks that exploit flaws in a program’s string handling. C-strings are terminated with the NUL character which has a value of 0. Thus, most of the string.h functions will return when they read a NUL byte. Security people like to avoid NUL’s for this reason. In this case, NUL characters are perfectly fine so we can just replace the extra0x2fwith an0x00and drop the shift command. See the original code in the link above for how my modifications differ.
Before going further, let’s explain what the shellcode above is doing. First we need to understand how a syscall works. A syscall, or system call, is a function call to the kernel asking that the kernel do something for us. This may be something that only the kernel has the permissions to do so we have to ask it to do it for us. In this case, the execve syscall tells the kernel that we would like it to start another process and replace our process address space with this new process’s address space. This means that, assuming execve succeeds, our process is essentially done executing.
In order to make a syscall on x86_64, we have to prepare for the syscall by moving the correct values to the correct registers and then issuing with syscall instruction. These correct values and registers are unique to each OS. I’m focusing on Linux here so let’s look at the documentation for the execve syscall:
%rax |
Syscall | %rdi |
%rsi |
%rdx |
|---|---|---|---|---|
59 |
sys_execve |
const char *filename |
const char *const argv[] |
const char *const envp[] |
It’s important to note that the values of these registers should be pointers to the memory location of their respective values. This means that we’ll have to push all the values to the stack and then copy the correct stack locations to the registers above. And you thought you would never say “wow, I miss the simplicity of pointers in C.”
A full list of syscalls can be found at http://blog.rchapman.org/post/36801038863/linux-system-call-table-for-x86-64.
If you’re familiar with the C prototype for the execve() function (below for reference), you’ll see that how similar the syscall setup is to calling the function from a C program.
1
int execve(const char *filename, char *const argv[], char *const envp[]);
For those familiar with x86, it’s important to note that the syscall procedure is quite different between x86 and x86_64. The syscall instruction does not exist in the x86 instruction set. In x86 syscalls are made by triggering an interrupt. Furthermore, in Linux, the syscall number for execve is different between x86 and x86_64. (11 on x86; 59 on x86_64).
Now that we know how to set up a syscall, let’s explain each step of the shellcode.
| Machine code | Instruction | Explanation |
|---|---|---|
\x48\x31\xd2 |
xor %rdx, %rdx |
Zero the %rdx register |
\x48\x31\xc0 |
xor %rax, %rax |
Zero the %rax register. We use this for NULL values later so it must zero'd. |
\x48\xbb\x2f\x62\x69\x6e\x2f\x73\x68\x00 |
mov $0x68732f6e69622f, %rbx |
Set the value of the %rbx register to \"hs/nib/\". Intel processors are little endian so the string must be backwards. A quick way to do this with Python is '/bin/sh'[::-1].encode('hex'). It is convenient that "/bin/sh" is 64bits so it fits within a single register. Anything longer would require some trickery to concatenate longer strings together. |
\x53 |
push %rbx |
Push the /bin/sh string (currently in register %rbx) to the stack. The push instruction will adjust the stack pointer for us. |
\x48\x89\xe7 |
mov %rsp, %rdi |
As per the syscall documentation, the %rdi register should point to the memory location of the program to execute. The stack pointer (register %rdi. |
\x50 |
push %rax |
The second argument to the execve() function is the argv array. This array should be NULL terminated. Intel processors are little endian so we have to push a NULL value to denote the end of the array onto the stack first. Remember that we zero'd %rax earlier so we only have to push this register to the stack to get our NULL value. |
\x57 |
push %rdi |
By convention, the first argument in the argv array is the name of the program. Remember that the argv array is really a pointer to an array of pointers to strings. In this case, the only value in the array is the name of the program. Also remember that the %rdi register now contains the memory location of the /bin/sh string on the stack. If we push this address to the stack, we now have an array of pointers to the strings that make up the argv array. |
\x48\x89\xe6 |
mov %rsp, %rsi |
As per the syscall documentation, the %rsi register should point to the memory location of the argv array. Since we just pushed the argv array to the stack, the stack pointer is pointing to the first element of argv. All we have to do is copy the stack pointer to the %rsi register. |
\xb0\x3b |
mov $0x3b, %al |
The last step is to put the syscall number (59 = 0x3b) into register %rax. Here, %al refers to the first byte of the %rax register. This puts 59 in the first byte of the %rax register. All other bits in %rax are still zero'd from before. |
\x0f\x05 |
syscall |
Once we're ready to go, issue the syscall instruction and the kernel will take it from here. Cross your fingers! |
Now we’re ready to change foo() to execute this shellcode. Instead of changing a single byte in foo() like before, we now want to replace foo() entirely. This looks like a job for memcpy(). Given a pointer to the start of foo() and a pointer to our shellcode, we can copy the shellcode to the location of foo() as such:
1
2
3
4
5
6
7
8
9
10
11
12
13
14
15
16
17
    void *foo_addr = (void*)foo;

    // http://www.exploit-db.com/exploits/13691/
    char shellcode[] =
        "\x48\x31\xd2"                              // xor    %rdx, %rdx
        "\x48\x31\xc0"                              // xor    %rax, %rax
        "\x48\xbb\x2f\x62\x69\x6e\x2f\x73\x68\x00"  // mov    $0x68732f6e69622f2f, %rbx
        "\x53"                                      // push   %rbx
        "\x48\x89\xe7"                              // mov    %rsp, %rdi
        "\x50"                                      // push   %rax
        "\x57"                                      // push   %rdi
        "\x48\x89\xe6"                              // mov    %rsp, %rsi
        "\xb0\x3b"                                  // mov    $0x3b, %al
        "\x0f\x05";                                 // syscall

    // Careful with the length of the shellcode here depending on what is after foo
    memcpy(foo_addr, shellcode, sizeof(shellcode)-1);
The only thing we have to be careful of writing past the end of foo(). In this case, we’re safe because foo() is 41 bytes long and the shellcode is 29 bytes. Note that because the shellcode is a C string, it has a NUL character at the end. We only want to copy the actual shellcode bytes so we subtract 1 from the sizeof shellcode in the length argument of memcpy.
Awesome! Let’s put it all together into a final program now.
1
2
3
4
5
6
7
8
9
10
11
12
13
14
15
16
17
18
19
20
21
22
23
24
25
26
27
28
29
30
31
32
33
34
35
36
37
38
39
40
41
42
43
44
45
46
47
48
49
50
51
52
53
54
55
56
57
58
59
60
61
#include <stdio.h>
#include <unistd.h>
#include <errno.h>
#include <string.h>
#include <sys/mman.h>

void foo(void);
int change_page_permissions_of_address(void *addr);

int main(void) {
    void *foo_addr = (void*)foo;

    // Change the permissions of the page that contains foo() to read, write, and execute
    // This assumes that foo() is fully contained by a single page
    if(change_page_permissions_of_address(foo_addr) == -1) {
        fprintf(stderr, "Error while changing page permissions of foo(): %s\n", strerror(errno));
        return 1;
    }

    puts("Calling foo");
    foo();

    // http://www.exploit-db.com/exploits/13691/
    char shellcode[] =
        "\x48\x31\xd2"                              // xor    %rdx, %rdx
        "\x48\x31\xc0"                              // xor    %rax, %rax
        "\x48\xbb\x2f\x62\x69\x6e\x2f\x73\x68\x00"  // mov    $0x68732f6e69622f2f, %rbx
        "\x53"                                      // push   %rbx
        "\x48\x89\xe7"                              // mov    %rsp, %rdi
        "\x50"                                      // push   %rax
        "\x57"                                      // push   %rdi
        "\x48\x89\xe6"                              // mov    %rsp, %rsi
        "\xb0\x3b"                                  // mov    $0x3b, %al
        "\x0f\x05";                                 // syscall

    // Careful with the length of the shellcode here depending on what is after foo
    memcpy(foo_addr, shellcode, sizeof(shellcode)-1);

    puts("Calling foo");
    foo();

    return 0;
}

void foo(void) {
    int i=0;
    i++;
    printf("i: %d\n", i);
}

int change_page_permissions_of_address(void *addr) {
    // Move the pointer to the page boundary
    int page_size = getpagesize();
    addr -= (unsigned long)addr % page_size;

    if(mprotect(addr, page_size, PROT_READ | PROT_WRITE | PROT_EXEC) == -1) {
        return -1;
    }

    return 0;
}
Compile it with:
1
$ gcc -o mutate mutate.c
Time to rub your lucky rabbit foot and execute this thing:
1
2
3
4
5
6
$ ./mutate
Calling foo
i: 1
Calling foo
$ echo "it works! we exec'd a shell!"
it works! we exec'd a shell!
And there you have it, a self-mutating C program.